Creating your own Certificate Authority and certs

Often its useful to create your own certificates for your own local network. Let’s go through the process of generating and signing certificates that can be trusted by your own machines.

First let’s create a location for storing CA information. We will use $HOME/certs for these examples and boomerain will be our example organization.

Creating our Certificate Authority

  1. We’ll first create a location for storing CA information. We will use $HOME/certs for these examples and boomerain will be our example organization.

    mkdir -p ~/certs
    cd ~/certs

  2. Create the CA private key. Keep this key and password safe!

    openssl genrsa -des3 -out boomerain.CA.key 2048

  3. Create a certificate signing request

    openssl req -verbose -new -key boomerain.CA.key -out boomerain.CA.csr -sha256
    > Country Name (2 letter code) [AU]:US
    > State or Province Name (full name) [Some-State]:New Jersey
    > Locality Name (eg, city) []:Lumberton
    > Organization Name (eg, company) [Internet Widgits Pty Ltd]:Boomerain
    > Organizational Unit Name (eg, section) []:
    > Common Name (e.g. server FQDN or YOUR name) []:CA for boomerain
    > Email Address []:<my email>

  4. Setup the CA configuration file. Create a file ca.conf with the following contents. This information is used with our CA signs requests.

     1
     2
     3
     4
     5
     6
     7
     8
     9
    10
    11
    12
    13
    14
    15
    16
    17
    18
    19
    20
    21
    22
    23
    24
    25
    26
    27
    28
    29
    30
    31
    32
    33
    34
    35
    36
    37
    38
    39
    40
    41
    42
    
    # we use 'ca' as the default section because we're usign the ca command
    [ ca ]
    default_ca = boomerain
    
    [ boomerain ]
    #  a text file containing the next serial number to use in hex. Mandatory.
    #  This file must be present and contain a valid serial number.
    serial = ./serial
    
    # the text database file to use. Mandatory. This file must be present though
    # initially it will be empty.
    database = ./index.txt
    
    # specifies the directory where new certificates will be placed. Mandatory.
    new_certs_dir = ./newcerts
    
    # the file containing the CA certificate. Mandatory
    certificate = ./boomerain.CA.crt
    
    # the file contaning the CA private key. Mandatory
    private_key = ./boomerain.CA.key
    
    # the message digest algorithm. Remember to not use MD5
    default_md = sha256
    
    # for how many days will the signed certificate be valid (10yrs)
    default_days = 3650
    
    # a section with a set of variables corresponding to DN fields
    policy = same_country
    
    [ same_country ]
    # if the value is "match" then the field value must match the same field in the
    # CA certificate. If the value is "supplied" then it must be present.
    # Optional means it may be present. Any fields not mentioned are silently
    # deleted.
    countryName = match
    stateOrProvinceName = supplied
    organizationName = supplied
    commonName = supplied
    organizationalUnitName = optional
    commonName = supplied

  5. Create an CA extensions file boomerain.CA.extensions.conf with This sets up the permissions of what the CA cert is allowed to do.

    1
    2
    3
    4
    5
    6
    7
    8
    
    basicConstraints=critical,@bs_section
    keyUsage=critical, keyCertSign, cRLSign
    extendedKeyUsage=emailProtection, serverAuth, clientAuth, timeStamping, msEFS, msCodeCom
    subjectKeyIdentifier = hash
    
    [ bs_section ]
    CA=true
    pathlen=1

  6. Setup the dir for signing.

    • Newly signed certs will be kept in newcerts.
    • index.txt will be tracking our signed certs and be used for revoking
    • serial keeps track of the number of the next cert to sign
      mkdir newcerts
      touch index.txt
      echo "01" > serial
  7. Sign your CA’s cert

    openssl ca -config ca.conf \
               -extfile boomerain.CA.extensions.conf \
               -out boomerain.CA.crt \
               -keyfile boomerain.CA.key \
               -verbose -selfsign -md sha256 \
               -enddate 210001010000Z \
               -infiles boomerain.CA.csr

Create certificates

Next we want to generate certificates that we will use. We will use $CERT_NAME for our new cert.

export CERT_NAME=<my_new_cert_name>

  1. Generate a certificate key. Don’t use a password here if you want to use with nginx, apache, etc.

    openssl genrsa -out $CERT_NAME.key 2048

  2. Next generate a signing request that our CA will use to sign our cert: I’m using .home here as my local network domain.

     1
     2
     3
     4
     5
     6
     7
     8
     9
    10
    11
    
    openssl req -verbose -new -key $CERT_NAME.key -out $CERT_NAME.csr -sha256
    
    echo "basicConstraints=CA:FALSE
    keyUsage = keyEncipherment, dataEncipherment
    extendedKeyUsage = serverAuth, clientAuth
    subjectAltName=@alt_names
    subjectKeyIdentifier = hash
    
    [ alt_names ]
    DNS.1 = *.home
    DNS.2 = home" > $CERT_NAME.extensions.conf

  3. Sign our request with our CA:

        openssl ca -config ca.conf -extfile $CERT_NAME.extensions.conf -out $CERT_NAME.pem -keyfile boomerain.CA.key -infiles $CERT_NAME.csr
        # Optional util I wrote for combining the CA cert and newly signed cert
        makechain $CERT_NAME.pem boomerain.CA.crt > $CERT_NAME.fullchain.pem

What is Go? Why use Go?

Go is a statically typed, complied programming language developed at Google and released in 2003.

Go is very fast (~30x faster than python). One of the reasons Go is so much faster than python is that Go is compiled into machine code and run directly on the CPU while Python is compiled into bytecode and run on a VM. Go has great concurrency support built into the language. It makes creating and running concurrent code extremely easy compared to other languages. Go also has managed memory so no malloc/free business. This makes Go much easier to work with and makes code less prone to errors. Its standard library and toolchain are excellent. The compiler is very fast and even very large projects typically compile in seconds. There are no complicated Makefiles to deal with.

It is also very easy to add dependencies with the go get command.

Hello World

This wouldn’t be an real intro without a hello world.

1
2
3
4
5
6
7
8
9
package main

import (
	"fmt"
)

func main() {
	fmt.Println("Hello World")
}

The first line of every go file must be the package name. The main package is special in go in that the main function in the main package is the entrypoint to code execution. The import block specifies each package we will be using. The fmt package is a built-in package for formatting and printing strings. Each function in go is defined by func. When we run this program we get the following output:

$ go run main.go
Hello World

Go is very opinionated

Go is a language that has very specific ways things must be done. For example, code will fail to compile if there are imported packages that are not used or variables that are defined and not used. This is ultimately beneficial for writing and maintaining good code. Code is easier to read when there are no unused variables and it also helps prevent bugs introduced by typos. Disallowing unused imports speeds up compilation.

Go also solves the code style debate by having a specific style built into the language tooling. By running go fmt, code will be formatted for you keeping all developers on the project on the same page.

Code directories are directly tied to package names and dependencies are placed in specific locations.

Type assignment

Types can be assigned explicitly:

var a int = 5

In this example the type is specified directly. Or implicitly:

a := 5

In the example above, the type of the variable is inferred based on the value being assigned. Go has built-in numeric types (such as int, int64, float, float64), booleans, and strings.

Interfaces and Structs

Interfaces are a collection of method signatures

type animal interface {
  say() string
}

Structs can implement an interface. In order to implement an interface a struct must contain all the methods on the interface along with the correct input and output types.

type dog struct {}

func (d dog) say() string {
  return "bark"
}

Go Concurrency

Go Concurrency" 
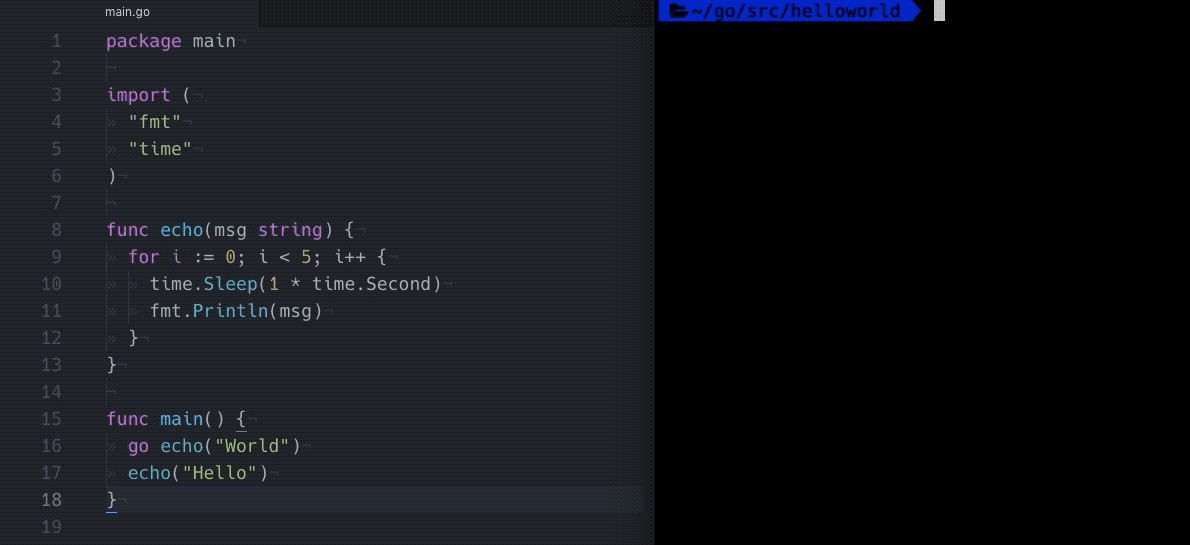
Concurrency in Go is handled by goroutines. Calling a function with the go prefix starts the function in a new goroutine. Mutex locks are built into the language, but for many cases its not required to manage locking manually. Go also has nice tools like race condition testing built into the test suite.

Channels

Go channels are another import component to concurrency in Go. Channels are used for sending and receiving data between different goroutines.

Here’s an example of channel creation.

// Make a channel that can store up to 50 int values
ch := make(chan int, 50)

A channel is created for ints than can hold up to 50 values.

To send and receive data on a channel the syntax looks like:

ch <- v    // Send data to the channel
v := <-ch  // Read from a channel and assign to a variable

Channels can also be closed to stop receivers from reading. Once a channel is closed, no more values can be sent to the channel. Attempting to do so will result in a Go panic.

close(ch)

Defer

Go allows running an action later in execution, usually for cleanup. Defer is similar in to having a finally block in Python code. Defer runs before a function returns. For example, if we wanted to write to a file and ensure we close it, we could to the following.

func writeStuff() {
    f := createFile("/tmp/somefile")
    defer closeFile(f)
    writeFile(f)
}

Putting it all together

Go Channels" 
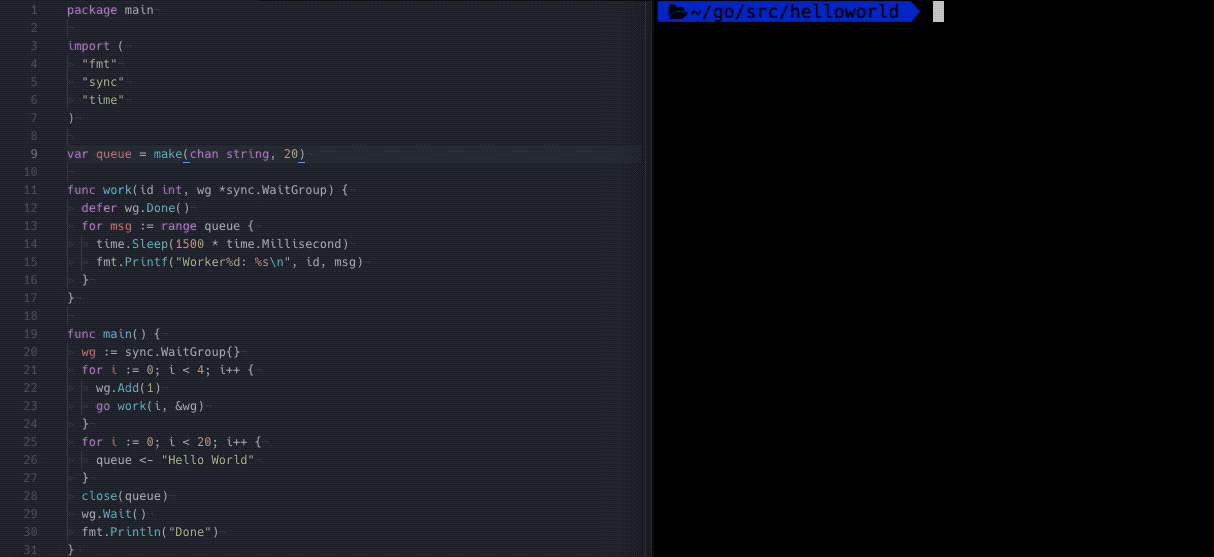
For this example, I need to explain one more concept. In Go a WaitGroup is a set of actions with members than can be waited on to complete execution. You can add members to the WaitGroup using WaitGroup.Add(1). When an individual member is done with execution, it can signal to the WaitGroup that it is done via WaitGroup.Done(). To block a goroutine while we wait on all members of the WaitGroup to complete, we can run WaitGroup.Wait().

In this example, we are doing the following:

  • Create a channel to hold 20 strings
  • Create 4 workers and add them to a WaitGroup
  • Add 20 messages of “Hello World” to our channel, then close the channel
  • Wait for all workers to complete
  • Each worker will grab messages from the channel
    • When the channel is closed and all messages have been received, the for loop will exit
  • Before returning the deferred statement will execute signaling the worker is done

What happened?

I originally created this blog to share my learnings. The original focus was on gaming, workouts, and technology. Things ended up being a lot busier last year than I originally anticipated and the focus was too broad. This blog ended up not being used. In 2019, I want to reboot this blog. I’ll be narrowing the focus to only technology. I will be posting at least once per week moving forward this year with the goal of consistent, quality content.

Stay tuned!

What is Boomerain?

Boomerain is a website all about the things I love. This will be focused on gaming, workouts, game development, and tech projects. It’s a way to share my thoughts, progress, and learning with the world. It’s also a way for me to maintain some accountability especially on the workout front. My goal for 2018 was to get into the best shape of my life. I’ve been pretty good in the past getting to where I wanted to be, but this year will be focused and I’ll share my progress with whoever will listen.

Enjoy!

James Grady

James is a Software and DevOps engineer, gamer, a fitness enthusiast.

He has 10 years of experience in the field. James is always working on a side project and loves sharing knowledge with the community. His favorite games are Hearthstone and Overwatch, but I also love to branch out and try new games. Especially indies.

If you want to know more about him professionally, check me out on Github, LinkedIn or Twitter:

GitHub LinkedIn Twitter

Oh and he has an adorable corgi too! Corgi Image